Leads
The Leads view is your command center for seeing all tracked prospects, their engagement scores, and detailed activity timelines.
What You'll See
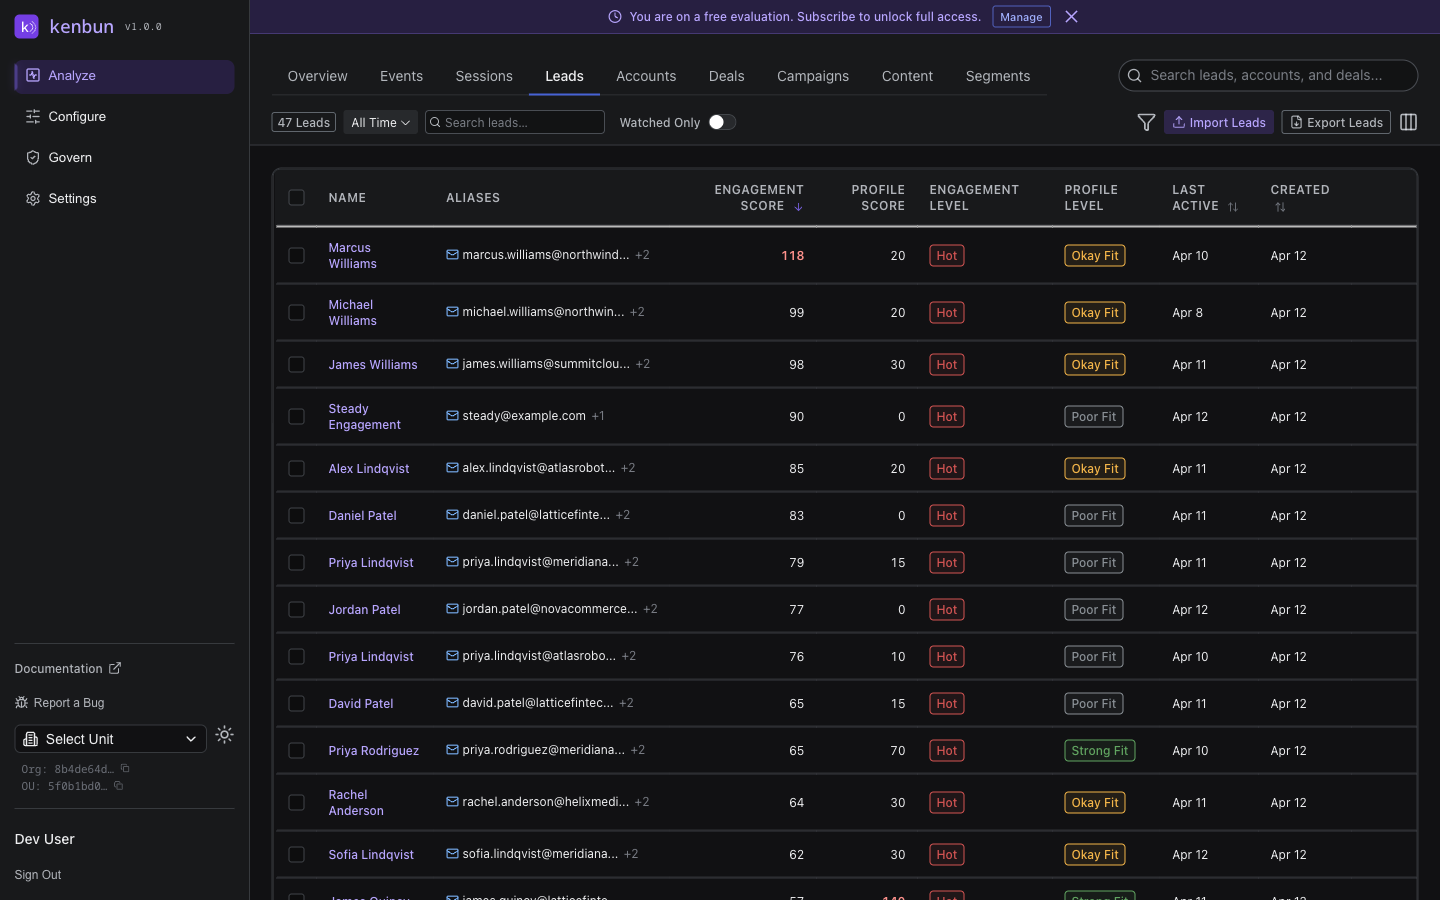
The leads table shows the following columns by default:
- Name: The lead's display name (or email if no name is set)
- Aliases: Email addresses and other identifiers linked to the lead
- Engagement Score: Current behavioral engagement score
- Profile Score: Current fit score (if profile scoring is enabled)
- Engagement Level: Engagement tier (e.g., "Hot", "Warm", "Cold")
- Profile Level: Profile fit tier
- Last Active: When the lead last engaged
- Created: When the lead first appeared in kenbun
Use the column visibility toggle in the toolbar to show additional columns, including Owner, Account, Account Score, Account Level, Title, and Company. These are hidden by default and persist your preference across sessions.
Finding Leads
Search
Type an email, domain, or name to instantly find a specific lead.
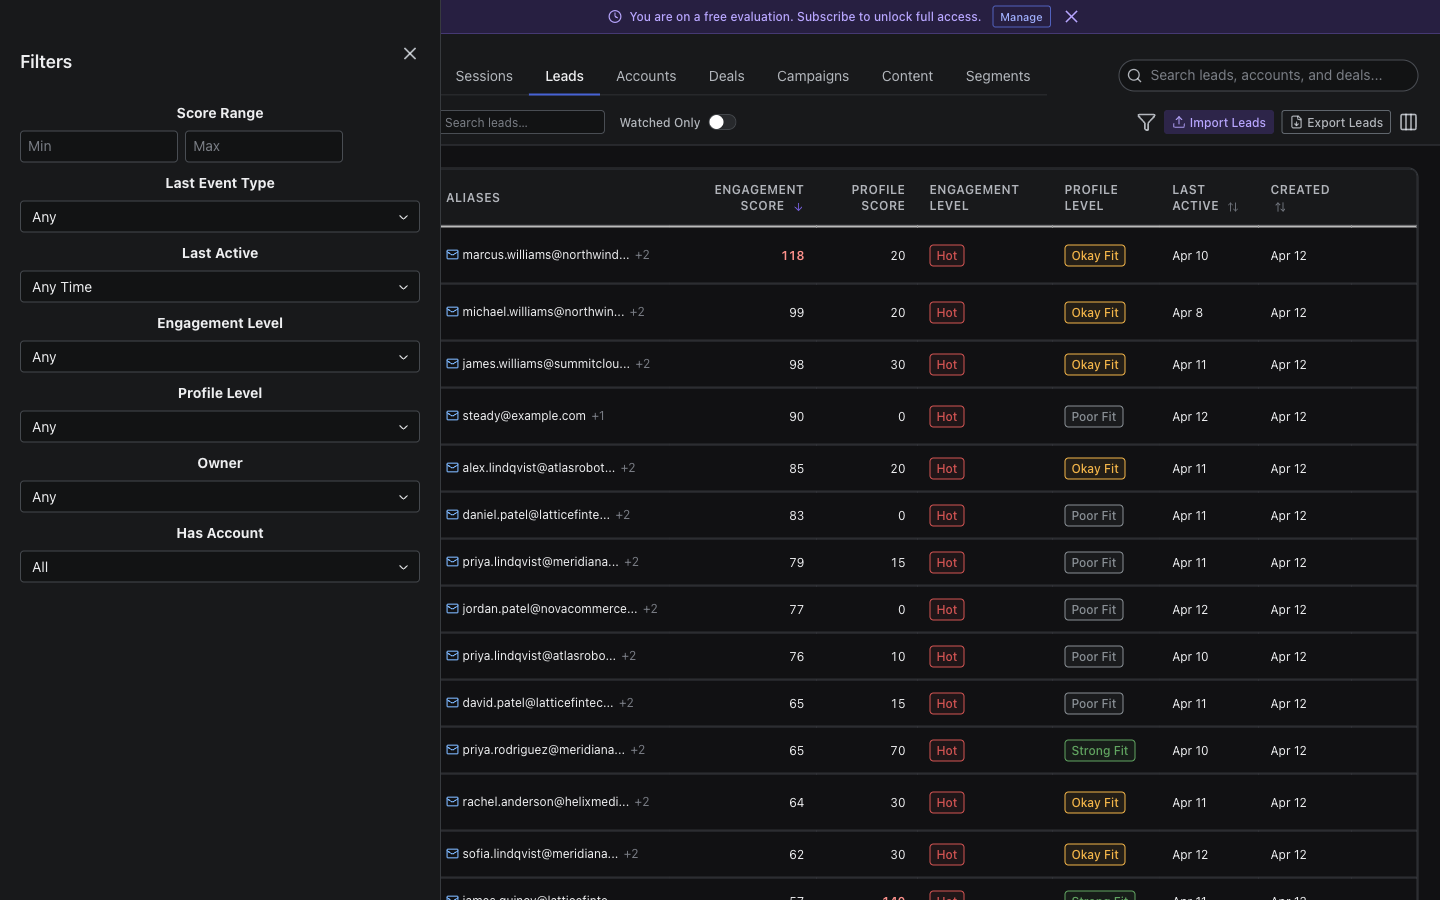
Filters
Narrow down leads by:
- Score Range: Find leads above/below a threshold
- Level: Show only "Hot" or "Very Hot" leads
- Last Activity: Leads active in the last 24 hours, 7 days, etc.
- Watch List: Show only watched leads
- Attributes: Filter by company size, industry, role (if profile scoring enabled)
Sort
Click column headers to sort by:
- Highest score first (find your hottest leads)
- Most recent activity (see who's engaging now)
- Most events (identify power users)
Lead Detail Page
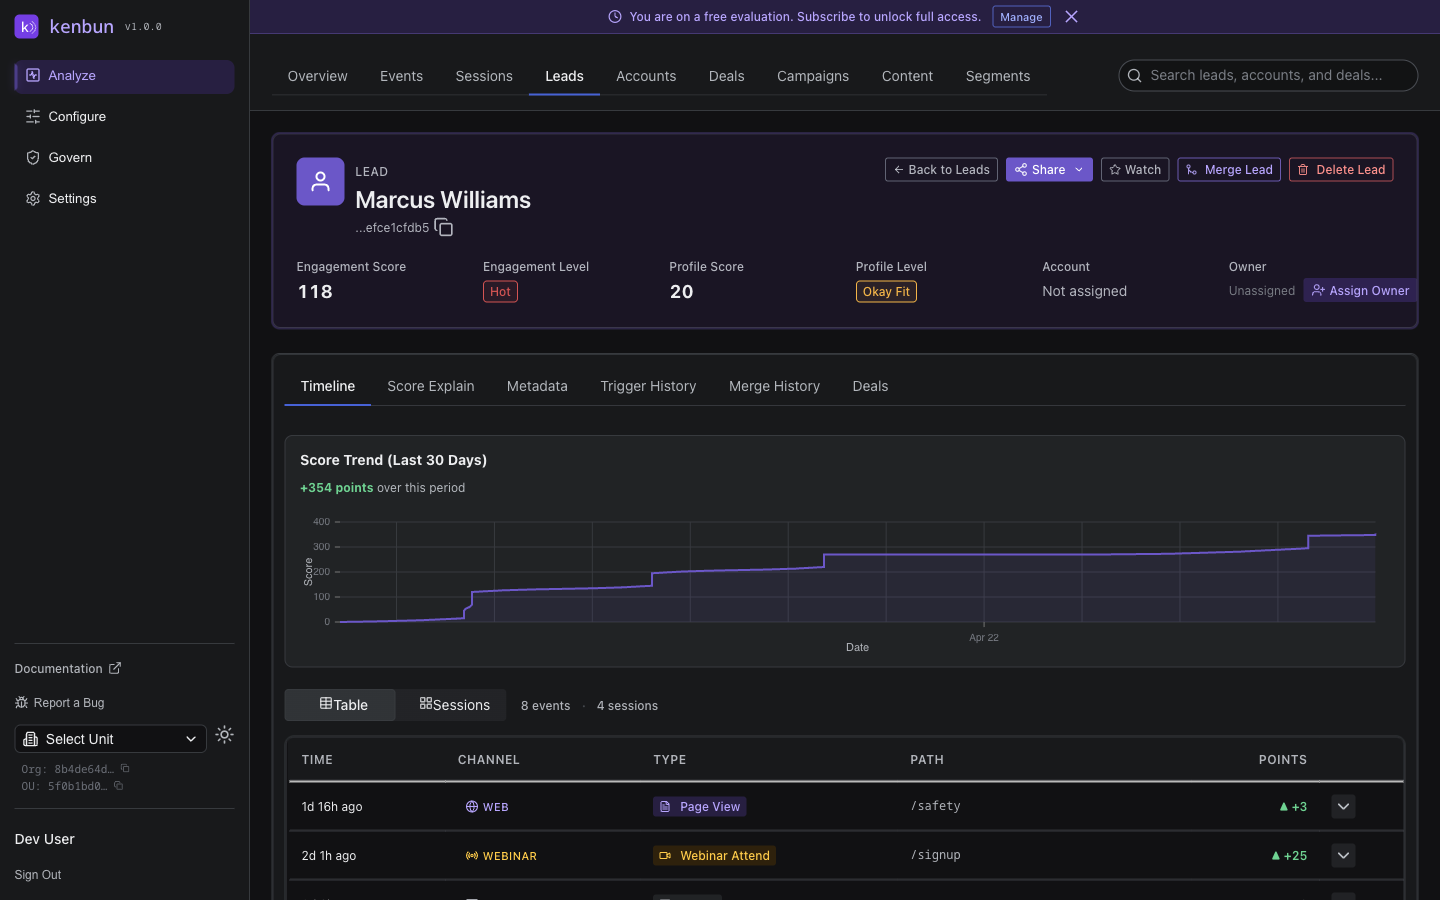
Click any lead to see their complete profile:
Activity Timeline
Chronological list of all events this lead has performed:
- When they opened emails
- Which pages they viewed
- Forms they submitted
- Trials they started
Score Breakdown
See exactly how the lead's score was calculated:
- Which events contributed points
- Score explanation showing the scoring logic
- Score history over time
Opening Score Explain from score columns: In the leads table, each score column (Engagement Score, Profile Score, and Account Score) is clickable. Clicking a specific score column opens the Score Explain panel with that score type's card shown first, so you land directly on the breakdown most relevant to you. The other score cards are visible below if you need them.
Score Explain panel features: When you open the Score Explain panel on a lead detail page, it shows:
- Matched rule name: The specific scoring rule that matched the event is displayed by name, not just the event type. If the rule has attribute filter conditions, those conditions are shown below the rule name so you can see exactly why the rule applied.
- Decay vs. negative rule distinction: Score reductions are visually distinguished based on their cause:
- A clock icon with an amber badge marks automatic score decay — points reduced because the lead has been inactive.
- A trending-down icon with a red badge marks intentional negative scoring rules — rules your team configured to subtract points for certain events.
- Unmatched rules disclosure: On the Profile Score and Account Score cards, a disclosure button shows any scoring rules that did not match the lead's attributes. Click Show N unmatched rules to expand the list. This helps you understand which criteria your lead or account did not meet, and where there is room to improve their score.
- Max level badge: When a lead or account reaches the top scoring level, a green Max level reached badge replaces the "N% to next level" indicator on the progress bar. This makes it immediately clear that the lead is at the ceiling for that scoring dimension.
- Share loading state: Clicking Share opens a popover that immediately shows a spinner while the shareable link is being generated, so you always have visual feedback that something is happening.
The decay vs. negative rule distinction helps your team quickly understand whether a score drop is expected inactivity decay or a deliberate signal from a negative scoring rule.
Conversion Badge: If this lead has a conversion event in their history (such as a closed-won deal or a Customer lifecycle stage), a green "Converted at X pts · [date]" badge appears next to the Score Trend chart title. This tells you the lead's score at the exact moment they converted — useful context when calibrating your own scoring thresholds.
Conversion Milestone Dots: On the score trend chart, any conversion event appears as a green dot so you can visually identify when in the engagement journey the lead converted.
Metadata
Demographic and firmographic data:
- Job title
- Company name
- Industry
- Company size
- Location
Lead Owner
Each lead can be assigned an owner -- the team member responsible for follow-up. The owner is displayed in the leads table and on the lead detail page.
To assign an owner:
- Open the lead detail page
- Click the Owner dropdown
- Select a team member from the list
To assign owners in bulk:
- Select multiple leads using the checkboxes
- Click Assign Owner in the toolbar
- Choose a team member
When assignment alerts are enabled in Notification Preferences, the assigned team member receives a notification.
Score Trend Indicators
The leads table shows a 7-day score trend next to each lead's engagement and profile scores. A small upward arrow in green means the score increased over the past 7 days; a downward arrow in red means it decreased. Hover over the indicator to see the exact point change. Leads with no arrow had no net change during that period.
Use these indicators to quickly spot who is heating up (prioritize outreach) and who is going cold (consider re-engagement campaigns) without clicking into each individual lead.
Exporting Leads
Click Export Leads in the page toolbar to download a CSV of all currently visible leads. The export respects any active filters and search terms, so you can export exactly the leads you need.
The export includes: lead ID, email, engagement score, profile score, engagement level, profile level, account, owner, last activity date, and creation date.
The export button is always available in the toolbar, whether or not you have any leads selected.
Adding Leads to a Segment
When you have leads selected (or all filtered leads selected), click Add to Segment in the toolbar to add them to an existing segment.
- Select one or more leads using the checkboxes (or use Select All to select all filtered leads)
- Click Add to Segment in the toolbar
- Choose the segment from the dropdown
- Click Add to Segment to confirm
This is useful for building segment membership manually when your automatic rules do not capture every case.
Watch List
Add leads to your watch list to:
- Get notifications when they engage
- Track high-priority prospects
- Monitor VIP accounts
Common Workflows
Prioritize Daily Outreach
Goal: Focus sales calls on the hottest leads
- Sort by Engagement Score (highest first)
- Filter to Last Activity: Last 7 days
- Review the top 10-20 leads
- Call them while they're engaged
Find Stalled Deals
Goal: Identify leads who went cold
- Filter to Last Activity: 30+ days ago
- Sort by Previous Engagement Score (if available)
- Look for leads who were once hot but haven't engaged recently
- Send re-engagement campaign
Monitor Campaign Impact
Goal: See which leads responded to a campaign
- Go to Events and filter by campaign ID
- Note which leads engaged
- Return to Leads and search for those leads
- Watch their scores increase as they continue engaging
Identify Product-Qualified Leads (PQLs)
Goal: Find trial users showing strong intent
- Filter by Event Type: trial_signup (via Events, then cross-reference)
- Look for trial users with high engagement scores
- Check activity timeline for signs of activation (e.g., "api_call", "invite_team_member")
- Prioritize outreach to activated trial users
Watch List
The Watch List lets you:
- Star important leads for easy access
- Get alerts when watched leads reach score thresholds
- Monitor key accounts or decision-makers
- Track competitors evaluating your product
Add to Watch List: Click the star icon next to any lead
Score History
View how a lead's score has changed over time:
- See score trends (rising, falling, flat)
- Identify engagement spikes
- Understand the impact of campaigns or outreach
- Learn more about Score History →
Merging Duplicate Leads
When the same person appears as multiple separate leads -- for example, because they engaged from a work email address and a personal one -- you can merge them into a single record.
To merge leads from the UI:
- Open the lead detail page for the lead you want to keep (the target)
- Click Merge Lead in the lead actions menu
- Search for and select the duplicate lead(s) to absorb
- Review the preview, which shows how many events, aliases, and sessions will be moved
- Click Confirm Merge
What merging does:
- All events from the absorbed lead(s) are moved to the target lead. Each moved event retains a reference to its original lead, so the history is never lost.
- Aliases (email, phone, etc.) are transferred. If both leads have an alias of the same type, the target's alias takes priority.
- Watch-list entries are transferred to the target.
- Scores are recalculated on the target from the combined event history.
- The absorbed lead(s) are removed from your leads list.
- A merge event appears in the target lead's activity timeline.
Merge History:
After a merge, the lead detail page shows a Merge History panel. Each entry shows:
- When the merge occurred
- Direction: whether this lead absorbed others (Absorbed) or was merged into another lead (Merged Out)
- Which leads were involved
- How many events were moved
- Who performed the merge
Click any row in the Merge History panel to expand it and see the full lead IDs and additional detail.
API Access
Manage leads programmatically:
- GET /leads - List all leads
- GET /lead/:leadID - Get lead details
- POST /leads/:leadID/owner - Assign or unassign an owner
- POST /leads/bulk-assign-owner - Bulk assign owners
- GET /lead/:leadID/score/explain - Score breakdown
- GET /score/history - Historical score data
- POST /lead/import - Bulk import leads
- POST /leads/merge - Merge duplicate leads
- POST /leads/merge/preview - Preview a merge before committing
- GET /leads/:leadId/merge-history - View merge history for a lead
Related Pages
- Events → - View lead activity
- Sessions → - Understand behavior patterns
- Accounts → - See account-level engagement
- Segments → - Group similar leads
- Watch List → - Track priority leads
- Score History → - Analyze score trends
- Lead Merge API → - Merge and preview merges programmatically